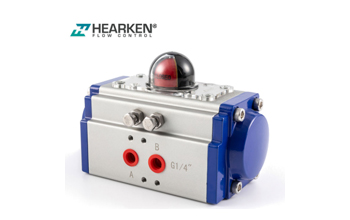
Installing a Quarter - Turn Pneumatic Actuator: A Step - by - Step Guide
Proper installation of quarter - turn pneumatic actuators ensures system operation.

1. Preparation
Before starting the installation, gather all the necessary tools, including wrenches, screwdrivers, and appropriate sealing materials. Ensure that the pneumatic actuator and the valve or mechanism it will be attached to are of compatible sizes and specifications. Also, make sure the power supply to the pneumatic system is turned off to prevent any accidental activation during installation.
2. Inspect Components
Carefully inspect the quarter - turn pneumatic actuator for any signs of damage during transit, such as cracks in the housing, bent shafts, or loose components. Check the valve or mechanism as well to ensure that its seating surfaces are clean and undamaged.
3. Mounting the Actuator
Position the pneumatic actuator over the valve or mechanism. Align the mounting holes on the actuator with the corresponding holes on the valve. Use the appropriate bolts and washers to secure the actuator in place. Tighten the bolts evenly in a criss - cross pattern to ensure a proper and secure fit. Avoid over - tightening, which could damage the components.
4. Connect the Shaft
The quarter - turn design of the actuator means it will typically connect to a valve shaft with a specific coupling mechanism. Slide the actuator shaft onto the valve shaft, ensuring a proper keyway or spline alignment if applicable. Some actuators may use a set - screw or locking collar to secure the connection. Tighten the set - screw or adjust the locking collar as per the manufacturer's instructions.
5. Pneumatic Connections
Locate the air inlet and outlet ports on the pneumatic actuator. Connect the compressed - air supply lines to these ports using suitable fittings. Make sure the connections are tight to prevent air leaks, which can affect the performance of the actuator. Use thread - sealant tape or liquid sealant on threaded connections as recommended.
6. Control Signal Wiring (if applicable)
If the actuator is equipped with position sensors or control - signal interfaces (such as for modulating control), connect the appropriate wiring. Follow the wiring diagram provided by the manufacturer to ensure correct polarity and connection to the control system.
7. Initial Check
After all the connections are made, visually inspect the installation to ensure that all components are properly installed and that there are no loose parts or misaligned connections. Check the orientation of the actuator to ensure that the quarter - turn movement will operate the valve in the desired manner.
8. Power - On and Testing
Once the visual inspection is complete, turn on the power supply to the pneumatic system. Slowly introduce compressed air to the actuator and observe its operation. Check for smooth quarter - turn movement of the actuator and ensure that the valve opens and closes as expected. Monitor for any air leaks, abnormal noises, or vibrations during operation.
9. Adjustment (if necessary)
If the actuator's performance is not as expected, some adjustments may be required. This could include adjusting the position of the limit switches (if present) to accurately indicate the valve's open and closed positions, or adjusting the air pressure regulator to achieve the desired operating force and speed.
10. Finalize and Document
After successful testing and any necessary adjustments, secure all the connections and components. Document the installation process, including any adjustments made, for future reference and maintenance. This will help in quickly troubleshooting any issues that may arise in the future.
By following these steps, you can ensure a proper and reliable installation of a quarter - turn pneumatic actuator, which is crucial for the efficient operation of the overall system it is part of.


